CREATIONS BY MARIE ANTOINETTE & EDIE MARIE

Welcome to our Team Blog! Marie Antoinette & Edie Marie have joined together to create a fun place to share our ideas and lives with all of you. We know that our teaming up has been confusing for some of you and we apologize. We will refer to ourselves as Marie Antoinette (the Doll Creator & maker of fabulous items) who lives in Peacock Paradise and Edie Marie (the creator of the posts and story telling on this blog & amateur crafter of many things in my "attic") who lives on Golden Pond. What great fun we have combining our forces!!

Thank you for stopping by to see what's happening in our studios in Peacock Paradise and on Golden Pond!

Saturday, February 1, 2014

IN LOVE WITH VALENTINES DAY !


LET'S CELEBRATE "LOVE" WITH 
A BANNER YOU CAN CREATE! 


 I chose the word "LOVE" because it 
conveniently only has 4 letters. (he-he) 

I used a Cricut Machine to cut out my 
shapes but you can cut them by hand 
into any shape you like. 

You'll need 4 pennant shapes cut out 
of scrapbook paper...


4 shapes of oval or round or 
 use 2 of each for variety and 
use different scrapbook paper 
for the different shapes...  


4 heart shapes in the same or 
different colors and shapes... 
 

the letters LOVE in whatever style 
font you like - you can just cut block 
letters that you've traced or purchase 
letters to use at your craft store. 
I used sparkly paper to add a bit 
of bling of course.  


 This step is totally optional. 
I wanted to ruffle things up a bit so 
I used crepe paper & craft glue to 
gather ruffles by hand and glue down. 
If you do this step make sure your 
shapes dry thoroughly. 


I use my Grandmother's extremely heavy 
iron to press things flat during the glue 
drying process. I also put the item on 
plastic so you can just peel it off in case 
it sticks by accident!  


Ta-Da! Fluff up the ruffles and
you end up with something like this. 


 I taped some paper doily edges 
around the oval shapes to give it 
a special look then used double 
sided tape to adhere them to the 
pennant shapes.


 Next it's time to attach the hearts 
and letters. I used "pop-up" adhesives 
to raise things up and give a dimensional 
look to the pieces. You can find pop-up 
adhesives at any craft store.


 You can see in this photo what 
it looks like popped up.


Now add bling!! 


 My, son the artist, felt the letters 
needed a bit more character so he 
took one of the fine artists pens he 
gifted to me and drew what you 
see below. I have to admit it does 
add something special!


 I had some red & silver sparkle hearts 
so they joined the mix.


To hang the hearts I used a double 
strand of 3" net ribbon in pink to 
thread the pennant pieces onto.
It needed something more... 
and in this case "more is more"! 

I made bows with the net ribbon. 
4 loops on each side, tied in the 
middle with pink curly ribbon. 


 Fluff the bows out and attach 
between the pennant pieces.


   I only added a sparkly gem on the 
point on each pennant.


 Oh you could add all kinds of glitter 
and sparkles, a lot more than I did.


 So here you have it. 
A banner of LOVE!


 I attached mine to my fireplace screen since 
I only have flickering lights in my vintage 
fireplace insert. No flames involved! 

You could hang this in a doorway, 
on a wall, in a window, 
on the headboard of of your bed... 
Ooh-la-la, you could make 
the banner say AMOUR!


Love is in the air so let's celebrate it 
and create something lovely 
for Valentines Day! 

*******
Here's a bit of my Valentine decor 
on Golden Pond.

A Valentine buffet fit for a Queen! 
Oh wait! We HAVE a QUEEN... 
Her Majesty, Queen Marie Antoinette!!
  
These treats are especially for you 
Marie. I've removed ALL the calories
just as you commanded. 

These are my faux desserts I created 
years ago to use for food decor. 
My little grands LOVE Grandma's 
fake treats! So fun for "make believe".


The 2 layer cake is made of a round 
paper mache box frosted in plaster 
and decorated with a pastry bag 
and tinted plaster. Then garnished 
with pearls. The centerpiece can 
be changed with the event. 


 The round chocolate torte is the lid from 
the paper mache box. Cookies are wood 
shapes frosted with tinted plaster and 
embellished with tiny beads. 
The brownies are cut from styrofoam 
and frosted with brown tinted plaster.


 The candies are stacked buttons glued 
together to make a scrumptious treat. 
Place them in candy papers and the 
illusion is complete.


 My tea service is ready for the Queen! 
Perhaps we'll have lavender tea.


 Maybe she would like a 
chocolate truffle made by the 
Royal Pastry Chef. 
They may be a bit chewy, they're 
actually candles in the shape of 
candy delights that I've had for 
some time now.


 The petit fours and cakes are made 
from styrofoam and lots of plaster 
frosting. Yellow paint on the  
 styrofoam makes it look just 
like cake! What fun!


 Of course the Queen may want a 
sip of champagne or moscata. 
Where are the champagne flutes?
Quick!! The Queen is almost here!!


 I've tucked some special 
Valentine touches here 
and there to add a 
splash of color.


 Vintage Valentines are so sweet.


 My Valentine girl from my 
childhood makes it all 
complete for me. She was given 
to me with flowers in the back 
of her skirt as a gift since I'm 
a February girl.

I'm ready for the Queen of Hearts!

 We're wishing you love, romance, happiness, 
hugs, kisses and more from 
Golden Pond 
Peacock Paradise! 

Edie Marie & Marie Antoinette
XOXOXOXO

Banner & post: Edie Marie a loyal subject
Collaboration: Her Royal Majesty, Queen Marie Antoinette
(Yes, we have lots and lots of fun together!)


WE'RE JOINING: 

Linda @ Coastal Charm #197
& Coastal Charm #198 
& Coastal Charm #199


 Patti & Paula @ Ivy & Elephants 


Jann @ Share Your Cup Thursday 


Laurie @ 
Bargain Decorating with Laurie
 Valentines Party


 Etsy Cottage Style @ 
Cottage Paper Crafts 
Party


Friday, January 10, 2014

WHAT GOES UP... MUST COME DOWN!


Marie's Whitmanville display at the 
Picayune Train Depot was a great 
success! Hundreds of people visited 
Whitmanville and was amazed and 
awestruck by the size and detail of her 
fabulous village. 

If you didn't have time to see Marie's 
display you can see it here. We know that 
many of you were extremely busy at the 
holidays. So now that the "rush" is over
you can take time to make a cup of tea  
or pour some coffee and take a look at 
the charm of Whitmanville on Utube. 

Well do you know the old saying: 
"What goes up... must come down."? 
It's the same with the village! 

Here's a good photo of the size 
of Marie's village:


And here's a look at the aftermath 
of Whitmanville which doesn't include 
all the tables, skirting, "snow", etc: 


Marie's hubby and daughter help her 
with the work involved with the village. 
She couldn't do it without their help. 
So now she has to find the storage "homes" 
for all of these boxes! Mercy! Marie says 
this is a process that lasts at least til the 
end of January. I'm tired just thinking about it. 

Thank you dear Marie for giving so many 
children and grownups such happiness 
at Christmas time. The Village of Picayune 
hopefully realizes what an incredible 
attraction your display is for their event.

 ******* 
Marie & I have fun figuring out what 
we're going to surprise each other with 
at Christmas! To say she went way 
overboard this year is an understatement. 

Box after box came to my house. 
First I received this gorgeous 
candle-lier! 

  
There's a place in the center for a 
votive candle. It's so tre chic!! 

Then here comes another box filled 
with all kinds of fun things. 


Marie knows how I love decorative 
boxes for storage and this one is 
beautiful. 
 

A photo doesn't begin to show how gorgeous 
this vintage hanky is. The little crocheted 
basket with flowers is separate and I'm sure 
was meant to be pinned on your blouse or 
dress. It's made of Irish Linen!  


 Look at this sweet vintage hanky. 
It's so delicate and lovely. The embroidery 
is very small and well done. The lace 
edge is a very soft aged netting, my 
favorite feel for lace. 
It drapes softly and perfectly.


 How adorable are these ballet slippers? 
They're satin over a very stiff structure 
just like real ballet shoes would be.  
They're so adorable and I even love the box!
I adore everything!


Tucked inside the box was 3 gorgeous peacock 
feather ornaments for my hubby. 
There's a bit of glitter inside that makes 
them sparkle. He hung them from our 
dining room chandelier and they looked 
so lovely. (Hubby & Marie are like 
brother & sister!) 


 Looky here what else was in the box... 
"Marie Cookies"! Can you believe it? 
As you can see I could only take photos 
of what's left of them. LOL


 They're these delightful crisp wafer 
cookies that are just the right sweetness 
to go with a cup of tea.


That's exactly what I've done... 
several times. 


Then these came in the mail... 

New Business Cards!!


Marie knew I was wanting to get new 
business cards after the holidays 
and she surprised me with new cards!
 I LOVE them!!
 

 The lady looks so tres chic and so 
Marie Antoinette era. The best part 
is the pair of swans she added.
Perfection! 
Marie ordered a digital download from 
an Etsy Shop, Country At Heart, and 
worked with the owner to add the swans. 
Thank you Marie for the awesome 
gifts, each one so fabulous!! 

*******
I had purchase some things for Marie to 
use in her doll making projects. 
I can't show those things to you because,
well, I wouldn't want you to have any 
advance info of her next Theater Doll themes. 

I had fun making something for her 
that I knew she would like.  
A Paper Shoe. She & I have talked 
about the art of paper shoes 
many times. 

I found a shoe pattern on line 
and made a small adjustment to it.


After finding the perfect scrapbook 
papers for my creation I went to work. 

I found the perfect Regal Crown Brooch 
garnished with pearls for the toe of the shoe.
I used shapes from my Cricket machine 
and more vintage jewels to give it that 
"Marie Antoinette" look.
 

French script for the heel of the shoe.
Ooh la la!
 

I found this adorable purse image to 
cut out on my Cricket. I embellished it 
with some fru-fru of course and it 
became a little gift card.


It came together well and  I was 
pleased with how it looked. 


Here it is displayed on Marie's mantel. 
I'm so happy she liked my creation for her.

I was on a roll and my mind immediately 
went to Celtic for Alex, Marie's sweet 
daughter. (She helps us so much with the 
"technical" things we haven't a clue about!)
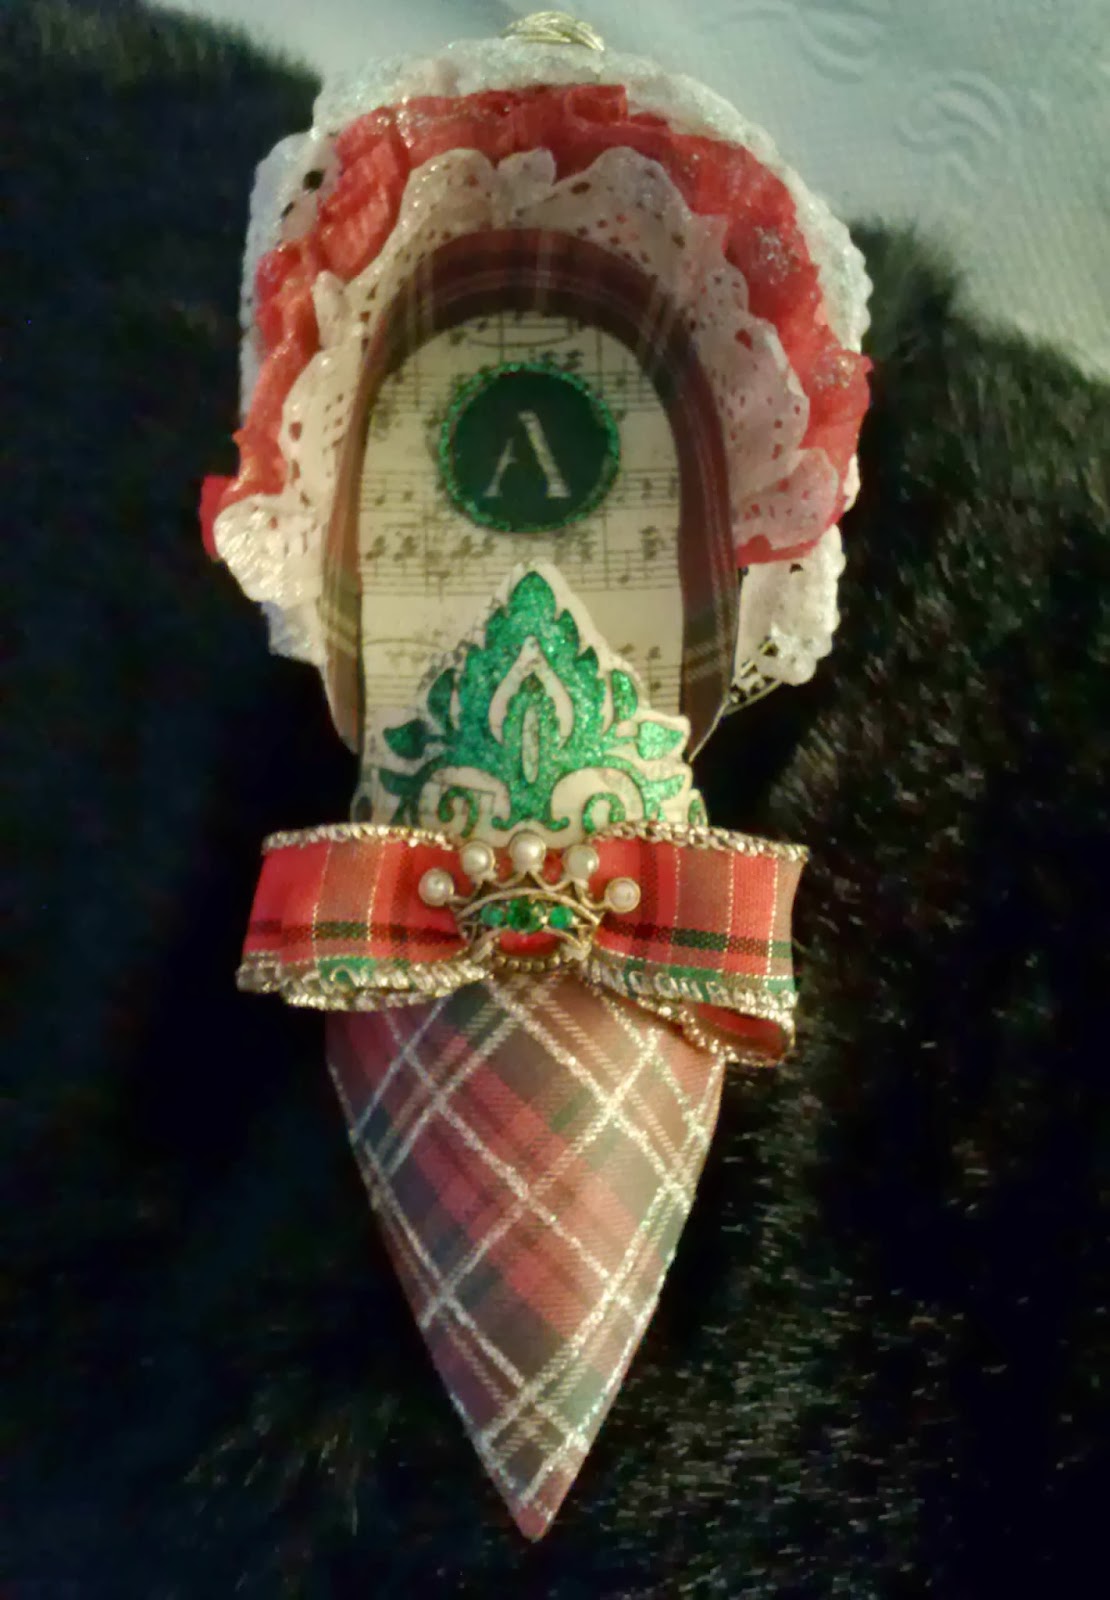
I had the perfect paper, a red Tartan plaid 
and some great shapes I could cut from 
my Cricket machine for embellishment. 


I had a Royal Crown Brooch for Alex's 
shoe that was embellished with "emeralds" 
and pearls. Just the right size to add to 
the bow. The cutouts for initials caught 
my eye on my Cricket which made it 
perfect in my mind!


 I had so much fun finding the perfect 
designs for her shoe and purse gift card. 


Here is Alex's shoe sitting in her Christmas 
tree. I made them to sit or be hung from a 
loop of ribbon on the heel. 


Alex even liked the monogrammed box 
I made for her shoe.
I'm so glad it fit your Celtic style Alex!

*******
I know you're probably sick of 
holiday things but I have to 
show you a bit of 
my holiday dining room 
on Golden Pond. 


We kept it simple... 
silver and gold.


Tres chic napkins, from a friend 
that knows how I LOVE anything 
French, gave the table 
a special Parisian feel!
 

Cheap Inexpensive ornaments in a silver 
bowl for an easy centerpiece. 
( China my darling Daddy gave me.)


A lovely tea service from darling hubby.
(Kiss-Kiss!).


Beautiful swan ornaments 
from a sweet friend to go with 
my Swan Lake Ballerina.  
( They will be in memory of Henry & Minnie 
that once swam on Golden Pond.)

Okay, I promise you NO MORE 
CHRISTMAS... well, I'm pretty sure. 

Marie and I are trying to get things 
sorted out and cleaned up in our 
studios so we can start on the project list 
that's floating around in our heads. 
You know the list I'm talkin' about! 
It seems endless! 

We'd like to thank Tristen Robin Blakeman
@ Enchanted Revelries
for featuring our December post on 
his blog. If you haven't visited Tristen's 
blog please pop over to see him!


HAPPY NEW YEAR 
TO ALL OF YOU! 

MARIE & EDIE
XOXO 

We're linking up with: 


Linda @ Coastal Charms 

and

Patti & Paula @ Ivy and Elephants

and

  Sandi @ Rose Chinz Cottage

and 

Diane @ Project Inspired